How to setup a RAID single filesystem from 3 disks + local loop file
We can use btrfs filesystem easily to setup a software RAID-0. In this document, I'll show you the procedure that not only setup the RAID-0 which combine all external storage devices but also expand it with a big local loop file into an one logical storage.
Table of content
1. Quick 2
2. Procedure 4
2.1. Setup BTRFS file system 4
2.2. Mount and create subvolume 4
2.2.1. Step 1: create subvolume 4
2.2.2. Step 2: Get the UUID 5
2.3. Expand the capacity 6
2.3.1. Create a loop device with 100GB 7
2.3.1.1. Step 1: Create a regular file 7
2.3.1.2. Step 2: Make btrfs filesystem 7
2.4. Associate a loop device 7
2.4.1. Associate the device (manually, Optional) 7
2.4.2. Permanent loop device 7
2.4.2.1. Step 1: Create the associate file 7
2.4.2.2. Step 2: Set executable permission 8
2.4.2.3. Step 3: Create a new systemd service 8
2.4.2.4. Verification 9
2.4.3. Expand the original BTRFS system 9
3. References 11
4. Appendix 11
5. Debug 11
1. Quick
Following quick instructions were used for my nextcloud server.
# == (A) Setup a btrfs RAID-0 logic device== # Data: Single, M: RAID1 sudo apt-get install btrfs-progs sudo mkfs.btrfs -L mybtrfs-pool -d single -f /dev/sda /dev/sdb /dev/sdc sudo mkdir /media/nextcloud/data sudo mount /dev/sda /media/nextcloud/data/
# verify df -h # <-- check the /dev/sda capacity sudo btrfs filesystem show # <-- check the v-dev structure
# == (B) Setup a loop device: 100GB == # create a regular file for i in {1..1}; do truncate -s 100G vdev_$i.img; done mkfs.btrfs vdev_1.img
# associate a loop device sudo losetup /dev/loop99 /home/pi/vdev_1.img # 使用 99 的原因是怕別的軟體占用, # 可用 sudo losetup -f 找出可用的 device # link: ref # permanent loop device vi /home/pi/mybtrfs-loop.sh File: /home/pi/mybtrfs-loop.sh #!/bin/bash sudo losetup /dev/loop99 /home/pi/vdev_1.img
# Important!! # Mount the system. Don't mount the filesystem in fstab file # replace fstab, use this line to mout btrfs system sudo mount -o loop /home/pi/vdev_1.img /media/nextcloud/data/ # undo # sudo losetup --detach /dev/loop99 vdev_1.img |
chmod u+x /home/pi/mybtrfs-loop.sh # important
# create a new systemd service sudo vi /etc/systemd/system/mybtrfs-loop.service File: /etc/systemd/system/mybtrfs-loop.service [Unit] Description= mybtrfs loop
[Timer] OnBootSec=60
[Service] Type=simple RemainAfterExit=yes ExecStart=/home/pi/mybtrfs-loop.sh TimeoutStartSec=0
[Install] WantedBy=default.target |
# activate the chage and make sure this is called autlmatically every reboot sudo systemctl daemon-reload sudo systemctl enable mybtrfs-loop.service sudo systemctl | grep mybtrfs-loop
# verification sudo shutdown -r now #<---------- reboot test sudo losetup -a # check if the loop6 was mapped
# == Expand the original BTRFS system == sudo btrfs filesystem show # show original
df -h # the original capacity
# (C) == Expand the original BTRFS system == sudo btrfs device add /dev/loop99 /media/nextcloud/data/ -f # change the capacity df -h # check the new capacity
# verification sudo shutdown -r now df -h |
2. Procedure
2.1. Setup BTRFS file system
Data: Single, M: RAID1
sudo apt-get install btrfs-progs sudo mkfs.btrfs -L mybtrfs-pool -d single -f /dev/sda /dev/sdb /dev/sdc sudo mkdir /mnt/mybtrfs-test-1 sudo mount /dev/sda /mnt/mybtrfs-test-1/ |
Verification
df -h

2.2. Mount and create subvolume
2.2.1. Step 1: create subvolume
sudo mount /dev/sda /mnt/mybtrfs-test-1/ sudo btrfs subvolume create /mnt/mybtrfs-test-1/sub1 |
E. g.

2.2.2. Step 2: Get the UUID
sudo btrfs filesystem show |
E.g.
Get the UUID: 3d087427-ec67-4d28-b593-a8d51dc5c28e
1.2.3. Set up fstab 注意: 如果你後面要用 loop device, 新增 btrfs loop 空間, 就不要在 fstab 自動 mout. 你要用 systemd service 的方式來 mount. 否則會因為 filesystem 還沒起來, 導致開不了機 File: /etc/fstab UUID=3d087427-ec67-4d28-b593-a8d51dc5c28e /mnt/mybtrfs-test-1 btrfs defaults 0 0 |
1.2.4. Verification sudo shutdown -r now df -h |
E.g. 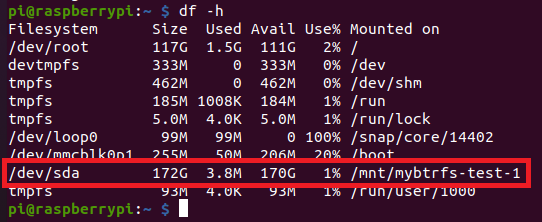
sudo btrfs filesystem show |
E.g. 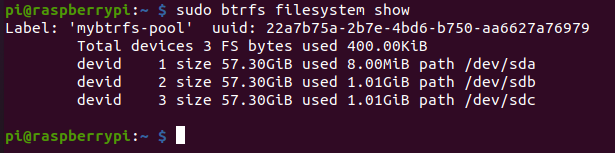
|
2.3. Expand the capacity
2.3.1. Create a loop device with 100GB
2.3.1.1. Step 1: Create a regular file
for i in {1..1}; do truncate -s 100G vdev_$i.img; done |
2.3.1.2. Step 2: Make btrfs filesystem
2.4. Associate a loop device
2.4.1. Associate the device (manually, Optional)
sudo losetup -a sudo losetup /dev/loop6 vdev_1.img # 使用 6 的原因是怕別的軟體占用, # 可用 sudo losetup -f 找出可用的 device # link: ref
# sudo losetup /dev/loop6 /home/pi/vdev_1.img
# undo # sudo losetup --detach /dev/loop6 vdev_1.img |
|
2.4.2. Permanent loop device
2.4.2.1. Step 1: Create the associate file
vi /home/pi/mybtrfs-loop.sh |
File: /home/pi/mybtrfs-loop.sh
#!/bin/bash sudo losetup /dev/loop99 /home/pi/vdev_1.img
# Important!! # Mount the system. Don't mount the filesystem in fstab file # replace fstab, use this line to mout btrfs system sudo mount -o loop /home/pi/vdev_1.img /mnt/mybtrfs-test-1/ # undo # sudo losetup --detach /dev/loop6 vdev_1.img |
2.4.2.2. Step 2: Set executable permission
chmod u+x /home/pi/mybtrfs-loop.sh # important |
2.4.2.3. Step 3: Create a new systemd service
sudo vi /etc/systemd/system/mybtrfs-loop.service |
File: /etc/systemd/system/mybtrfs-loop.service
[Unit] Description= mybtrfs loop
[Timer] OnBootSec=60
[Service] Type=simple RemainAfterExit=yes ExecStart=/home/pi/mybtrfs-loop.sh TimeoutStartSec=0
[Install] WantedBy=default.target |
Step 4: Activate the chage and make sure this is called autlmatically every reboot
sudo systemctl daemon-reload sudo systemctl enable mybtrfs-loop.service sudo systemctl | grep mybtrfs-loop |
E.g.

2.4.2.4. Verification
sudo shutdown -r now #<---------- reboot test sudo losetup -a # check if the loop6 was mapped |
E.g.

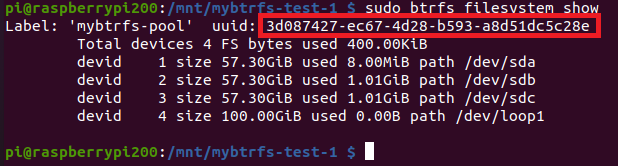
2.4.3. Expand the original BTRFS system
sudo btrfs filesystem show # show original
df -h # the original capacity
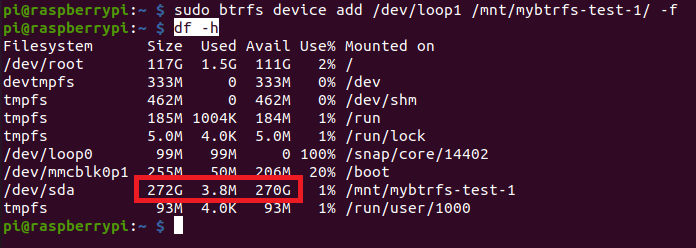
sudo btrfs device add /dev/loop6 /mnt/mybtrfs-test-1/ -f # change the capacity df -h # check the new capacity |
E. g.
Check the original capacity
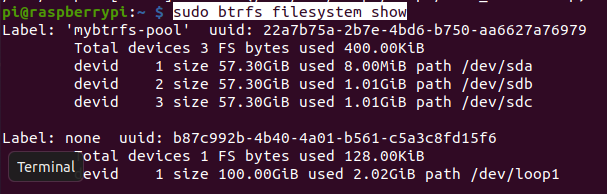
Fig. This is an example that use /dev/loop1.

After resize
reboot

3. References
https://btrfs.wiki.kernel.org/index.php/Using_Btrfs_with_Multiple_Devices#Adding_new_devices
https://askubuntu.com/questions/54970/how-to-set-up-a-loop-device-at-boot-time
https://www.golinuxcloud.com/run-script-at-startup-boot-without-cron-linux/
4. Appendix
5. Debug
How to see the Systemd log (ref)
journalctl -u service-name.service
E. g. sudo journalctl -u mybtrfs-loop.service |
For 64bit OS, following instructions will failure in loop.service. sudo mount /dev/sda /mnt/mybtrfs-test-1/ |
The error message Dec 20 00:48:16 raspberrypi systemd[1]: Started mybtrfs loop. Dec 20 00:48:17 raspberrypi sudo[425]: root : PWD=/ ; USER=root ; COMMAND=/usr/sbin/losetup /dev/loop6 /home/pi/vdev_1.img Dec 20 00:48:17 raspberrypi sudo[425]: pam_unix(sudo:session): session opened for user root(uid=0) by (uid=0) Dec 20 00:48:17 raspberrypi sudo[425]: pam_unix(sudo:session): session closed for user root Dec 20 00:48:17 raspberrypi sudo[537]: root : PWD=/ ; USER=root ; COMMAND=/usr/bin/mount -L mybtrfs-pool /mnt/mybtrfs-test-1/ Dec 20 00:48:17 raspberrypi sudo[537]: pam_unix(sudo:session): session opened for user root(uid=0) by (uid=0) Dec 20 00:48:18 raspberrypi mybtrfs-loop.sh[540]: mount: /mnt/mybtrfs-test-1: wrong fs type, bad option, bad superblock on /dev/sdc, missing codepage or helper program, or other error. Dec 20 00:48:18 raspberrypi sudo[537]: pam_unix(sudo:session): session closed for user root Dec 20 00:48:18 raspberrypi systemd[1]: mybtrfs-loop.service: Main process exited, code=exited, status=32/n/a Dec 20 00:48:18 raspberrypi systemd[1]: mybtrfs-loop.service: Failed with result 'exit-code'.
|
Work-around Postpone to mount the filesystem after system boot in 10sec. File: /etc/systemd/system/mybtrfs-loop.service ... [Timer] OnBootSec=60
... |
2. MOVE the mount command in .bashrc vi .bashrc sudo mount -L mybtrfs-pool /mnt/mybtrfs-test-1/ |
|
|
Fstab mount? 直接 reboot 會出錯!
不知道為甚麼> 只要加入下面的 loop devie sudo btrfs device add /dev/loop6 /mnt/mybtrfs-test-1/ -f # change the capacity
fstab 動態 mount sudo mount /dev/sda /mnt/mybtrfs-test-1/ 就會出錯!
Q: 能不能直接用 systemd script 取代 fstab?
|
Note for RAID5 configuration
If the /mnt/mybtrfs is btrfs RAID5, available capacity 170GB even you add a single vdev.ce
RAid5
sudo mkfs.btrfs -L mybtrfs-pool -d raid5 -m raid5 -f /dev/sda /dev/sdb /dev/sdc sudo mount /dev/sda /mnt/mybtrfs-test-1/ |
See following.

