How to setup Nextcloud server in
Raspberry LXD Container with
ZFS system backend
井民全, Jing, mqjing@gmail.com
Slow but worked. Maybe It's time to replace 3B+ to 4.
下面這篇文章把 樹梅派, Nextcloud, ZFS, software RAID, LXD container, Proxy network 全部合在一起, 按圖施工照表操課.
系統正常運作, 但是樹梅派已經吃不消了!
不就是簡單的 WebDav protocol 都顯著變慢.
相較之下,之前的設定 用 loop device 搭配簡單 btrfs, 效能好很多. 也是我現在正在用的系統設定, 只是沒有使用到 RAID,
如果你 btrfs 版本有興趣, 可以參考下面連結.
https://docs.google.com/document/d/14gJyfRz6ARCvxZnsUP8Ov0NY5XReC4fvB8pHA1UMkZY/edit?usp=sharing
如果你對 zfs +raidz 有興趣,請繼續閱讀。
I like ZFS fiesystem, so, yesterday, I decided set up experiment Nextcloud server in my Raspberry LXD container with ZFS system. Here is the detail procedure, you can find at blew.
However, the performance running on Raspberry Pi is poor. Maybe RAIDZ1 with compress and deduct take too much resource to handle simple WebDev protocol for RasperryPi 3B+?
The performance issue gots me interesting on whether the configuration that btrfs with software RAID
has the same issue.
[nextcloud, rasp, lxd, btrfs] How to install Nextcloud server in Raspberry LXD Container with BTRFS storage backend (view), (blog)
Anyway, I'll test it for days.
1. Procedure 2
1.1. ZFS 2
1.1.1. Step 1: Install & setup zfs 2
1.1.2. Step 2: Create a zfs pool & mount the pool 2
1.1.3. Step 3: Create a dataset with compression and dedup function 2
1.1.4. Verification 3
1.2. LXD 3
1.2.1. Step 1: Install & setup lxd 3
1.2.2. Step 2: Set up the exist zfs dataset for container 3
1.2.3. Verification 4
1.2.3.1. zfs list 4
1.2.3.2. zpool list 4
1.3. Ubuntu Intance 5
1.3.1. Install & setup Ubuntu instance 5
1.3.2. Setup network 5
1.3.2.1. Router Mode 5
1.3.2.2. NAT Mode 6
1.3.2.2.1. Setup Network & update 6
1.3.2.2.2. Setup proxy 7
1.4. Nextcloud 8
1.4.1. Step 1: Install & setup 8
1.4.2. Step 2: Setup self-sign (for https) 8
2. Reference 9
3. Further Info 9
1. Procedure
1.1. ZFS
1.1.1. Step 1: Install & setup zfs
lsblk #check all your block storage devices
# umount all partitions sudo umount /dev/sda?; sudo wipefs --all --force /dev/sda?; sudo wipefs --all --force /dev/sda sudo umount /dev/sdb?; sudo wipefs --all --force /dev/sdb?; sudo wipefs --all --force /dev/sdb sudo umount /dev/sdc?; sudo wipefs --all --force /dev/sdc?; sudo wipefs --all --force /dev/sdc lsblk # check no mount points
# install zfs on your raspberry sudo apt install raspberrypi-kernel-headers sudo apt install zfs-dkms zfsutils-linux # it takes time: 30 mins dmesg | grep ZFS # check zfs module zfs --version # check the zfs version |
1.1.2. Step 2: Create a zfs pool & mount the pool
# create a RAIDZ1 zpool sudo zpool create myzfspool raidz1 sda sdb sdc -f lsblk # check the partitions for each devices
# verify zpool status # check the pool status
# setup properties sudo zfs set mountpoint=/mnt/myzfspool myzfspool # setup mount point |
1.1.3. Step 3: Create a dataset with compression and dedup function
sudo zfs create myzfspool/mydataset # create dataset on the pool sudo zfs set compression=on myzfspool/mydataset # enable compression sudo zfs set dedup=on myzfspool/mydataset # enable deduption
# check df -h #make sure linux can see it ls /mnt/myzfspool/mydataset
# undo # sudo zfs destroy -r myzfspool/mydataset |
1.1.4. Verification
zpool status # check the pool status |

1.2. LXD
1.2.1. Step 1: Install & setup lxd
sudo snap install lxd --channel=latest/stable sudo usermod -a -G lxd ${USER} su - ${USER} # apply the new group membership
|
1.2.2. Step 2: Set up the exist zfs dataset for container

1.2.3. Verification
1.2.3.1. zfs list

1.2.3.2. zpool list

1.3. Ubuntu Intance
1.3.1. Install & setup Ubuntu instance
lxc launch images:ubuntu/20.04 ubuntu-container lxc exec ubuntu-container -- ip a # 10.84.19.200 lxc exec ubuntu-container -- apt-get update |
E.g.

Check po

1.3.2. Setup network
1.3.2.1. Router Mode
# Step 1: Create a template profile for your next containers lxc profile create my-routed EDITOR=vim lxc profile edit my-routed
config: user.network-config: | version: 2 ethernets: eth0: addresses: - 192.168.1.201/32 nameservers: addresses: - 8.8.8.8 search: [] routes: - to: 0.0.0.0/0 via: 169.254.0.1 on-link: true description: Default LXD profile devices: eth0: ipv4.address: 192.168.1.201 nictype: routed parent: wlan0 type: nic name: my-routed_192.168.1.201 used_by: |
# Step 2: Setup your container with the profile and run lxc profile copy my-routed my-routed_192.168.1.201 EDITOR=vim lxc profile edit my-routed_192.168.1.201 lxc launch ubuntu:20.04 c2 --profile default --profile my-routed_192.168.1.201
# Verification lxc exec c1 -- /bin/bash ping www.kimo.com ip a |
E.g.
1.3.2.2. NAT Mode
1.3.2.2.1. Setup Network & update
lxc launch images:ubuntu/20.04 ubuntu-container lxc exec ubuntu-container -- passwd ubuntu lxc exec ubuntu-container -- apt-get update lxc exec ubuntu-container -- ip a # 10.84.19.200 |
E.g.

1.3.2.2.2. Setup proxy
lxc config device add ubuntu-container myport443 proxy listen=tcp:0.0.0.0:443 connect=tcp:127.0.0.1:443 |
Test
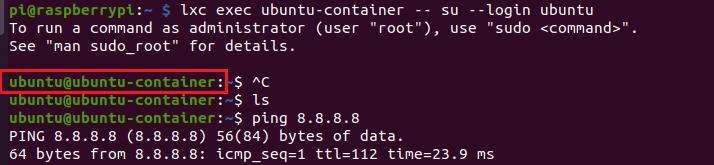
# lxc exec ubuntu-container -- /bin/bash lxc exec ubuntu-container -- su --login ubuntu |
E.g.
Check pool

1.4. Nextcloud
1.4.1. Step 1: Install & setup
lxc exec ubuntu-container -- su --login ubuntu
# reinstall the packages in container for nextcloud sudo apt install -y snapd sudo snap install core sudo reboot # reboot the container lxc exec ubuntu-container -- su --login ubuntu
# stable version sudo snap install nextcloud # 24.0.6 --> issue: cannot create subfolder. # latest version (26.0.0 dev) Nextcloud Hub 3 (26.0.0 dev Build:2022-11-06T23:34:07 # sudo snap remove nextcloud # remove previous nextcloud # sudo snap install nextcloud --channel=latest/edge
verify snap changes nextcloud snap info nextcloud sudo systemctl | grep nextcloud |
1.4.2. Step 2: Setup self-sign (for https)
sudo /snap/bin/nextcloud.enable-https self-signed |
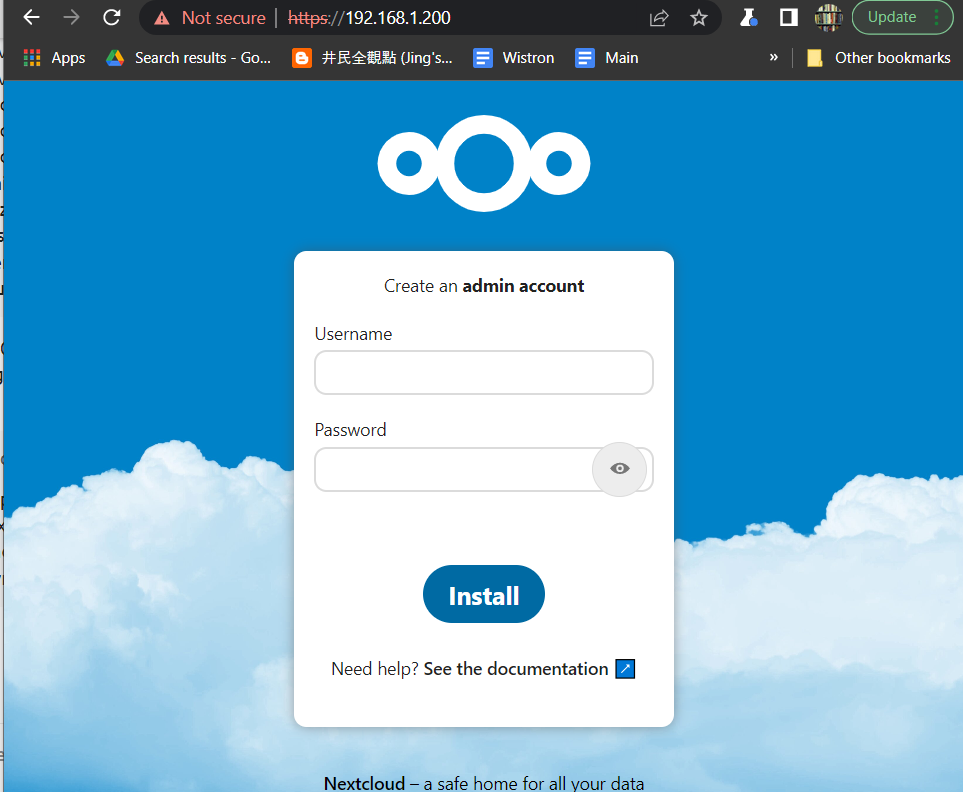
E.g.

Check
https://192.168.1.200
2. Reference
https://docs.google.com/spreadsheets/d/1yOlHZjv9NlYr-PwiiCUjcxa9euxTlzKO5YWOHms0Qb4/edit?usp=sharing
3. Further Info
[nextcloud, rasp, lxd, btrfs] How to install Nextcloud server in Raspberry LXD Container with BTRFS storage backend (view), (blog)