How to setup network for your
LXD containers between hosts
(Static IP)
井民全, Jing, mqjing@gmail.com
FAQ: Docker, LXD, KVM, Vagrant, VirtualBox, VMWare, Hyper-V
如果你想讓你的 LXD container 掛上 host 的 subnetwork, 並且能夠讓上面的各式 host 自由存取containers 上
執行的為服務, 就像在 VirtualBox 或 VMWare 設定你的 VM 網路使用 bridge 模式一樣. 請服用這篇文章.
This document shows you how to get your containers to be accessed between hosts. You can set your
containers on the same subnet with host and communicate each other just like as an other
machine on the net.
The key idea is to create a LXD profile in which we setup the router and redirect the traffic to the parent
of host nic, for my case, this is the ens33. The knowledge used in this document were fully follow to the
doc[1], if you are interested in detail, check it to get more.
Table of contents
1. Quick 2
2. Procedure 3
2.1. Install LXD 3
2.2. Get your host network informaiton 4
2.3. Create a templated lxd profile 5
2.4. Copy and Use the profile for your containers 5
3. Verification 6
3.1. Test 1: Access www.kimo.com 6
3.2. Test 2: Access from Host 7
4. Appendix 8
4.1. Create another container with the router 8
4.2. Verification 9
4.2.1. Test 1: Test traffic to Internet 9
4.2.2. Test 2: Traffic from Host 9
5. References 9
1. Quick
# Step 1: Install LXD and initial it sudo snap install lxd --channel=latest/stable sudo apt-get install bridge-util # install bridge util sudo usermod -a -G lxd ${USER} su - ${USER} # apply the new group membership lxd init
# Step 2: Get your host nic name (here is ens33) and the host subnet ip a # Get to known the sub-net and the host nic name lxc network list
# Step 3: Create a template profile for your next containers lxc profile create my-routed lxc profile edit my-routed
config: user.network-config: | version: 2 ethernets: eth0: addresses: - 192.168.1.200/32 nameservers: addresses: - 8.8.8.8 search: [] routes: - to: 0.0.0.0/0 via: 169.254.0.1 on-link: true description: Default LXD profile devices: eth0: ipv4.address: 192.168.1.200 nictype: routed parent: ens33 type: nic name: my-routed_192.168.1.200 used_by: |
# Step 4: Setup your container with the profile and run lxc profile copy my-routed my-routed_192.168.1.200 EDITOR=vim lxc profile edit my-routed_192.168.1.200 lxc launch ubuntu:20.04 c1 --profile default --profile my-routed_192.168.1.200
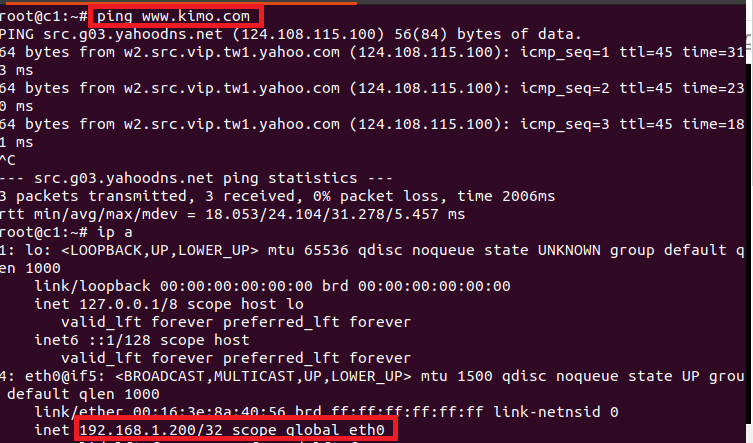
# Verification lxc exec c1 -- /bin/bash ping www.kimo.com ip a
|
2. Procedure
2.1. Install LXD
sudo snap install lxd --channel=latest/stable sudo usermod -a -G lxd ${USER} su - ${USER} # apply the new group membership
lxd init ==> Size in GiB of the new loop device (1GiB minimum) [default=23GiB]: 115GiB
# if you want to remove the container # lxc delete ubuntu-container --force
# install bridge util sudo apt-get install bridge-util
# list network lxc network list
# delete default router # sudo apt-get install bridge-utils # sudo apt-get install # sudo ifconfig lxdbr0 down # sudo brctl delbr lxdbr0 # lxc network delete lxdbr0
# remove lxd sudo snap remove lxd --purge |
2.2. Get your host network informaiton
The nic name and the subnet are the points that will be used for the traffic parent the ip address for
your container. Here, the parent nic will be ens33 and the subnet will be 192.168.1.x.
e.g.


2.3. Create a templated lxd profile
lxc profile create my-routed lxc profile edit my-routed |
Fill the following setup. Nerermind, the statement "169.254.0.1". It will get assigned by lxd for the routed inteface.
config: user.network-config: | version: 2 ethernets: eth0: addresses: - 192.168.1.200/32 nameservers: addresses: - 8.8.8.8 search: [] routes: - to: 0.0.0.0/0 via: 169.254.0.1 on-link: true description: Default LXD profile devices: eth0: ipv4.address: 192.168.1.200 nictype: routed parent: ens33 type: nic name: my-routed_192.168.1.200 used_by:
|
2.4. Copy and Use the profile for your containers
lxc profile copy my-routed my-routed_192.168.1.200 EDITOR=vim lxc profile edit my-routed_192.168.1.200 lxc launch ubuntu:20.04 c1 --profile default --profile my-routed_192.168.1.200
lxc profile copy my-routed my-routed_192.168.1.201 EDITOR=vim lxc profile edit my-routed_192.168.1.201 |
check
lxc profile list
e.g.

e.g.

Check the container router.
The traffic will via 169.254.0.1.

3. Verification
3.1. Test 1: Access www.kimo.com
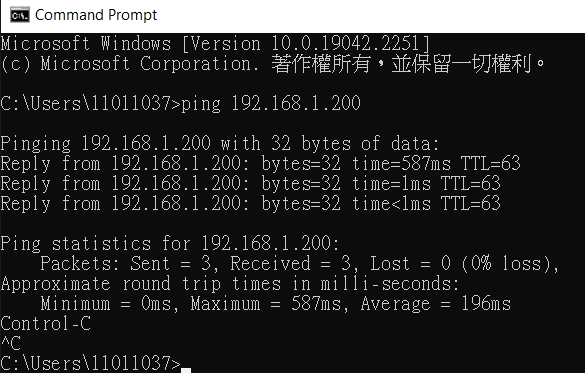
3.2. Test 2: Access from Host
4. Appendix
4.1. Create another container with the router
lxc launch ubuntu:20.04 c2 --profile default --profile my-routed_192.168.1.201 lxc list |
e.g.

4.2. Verification
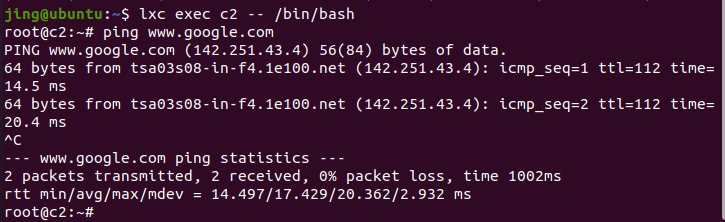
4.2.1. Test 1: Test traffic to Internet
4.2.2. Test 2: Traffic from Host

5. References
https://blog.simos.info/how-to-get-lxd-containers-get-ip-from-the-lan-with-routed-network/
https://thomas-leister.de/en/lxd-use-public-interface/