How to switch the image when user clicked the button
井民全, Jing, mqjing@gmail.com
GitHub
Here, I will show you how to write a simple app that switches the component's image when a user clicked on the button. Check the dynamic diagram below.
Enjoy!
By Jing.
Fig. The dynamic flow. (edit)
1. The Points
[App.tsx] Use ref to connect your HTML element and your component. (see ref. [2])
[Component] import the image resource at first
Ex:
import redlight from './res/redlight-v3.png'
[Component] Use setState method. It wil trigger component's render event
Ex:
this.setState({data : this.RED_LIGHT})
[Component] The object type can be used to group around the complex data type
Ex:
RED_LIGHT = {id:0, strName:'red light', strLoc: redlight};
Tree
├── package.json ├── public ├── README.md ├── src │ ├── App.css │ ├── App.test.tsx │ ├── App.tsx │ ├── component │ │ ├── my-image.tsx │ │ └── res │ │ ├── greenlight-v3.png │ │ └── redlight-v3.png │ ├── index.css │ ├── index.tsx │ ├── logo.svg │ ├── react-app-env.d.ts │ ├── reportWebVitals.ts │ └── setupTests.ts ├── tsconfig.json └── yarn.lock |
2. Code
2.1. Component (MyImage)
File: ./src/component/my-image.tsx
import React from 'react';
import redlight from './res/redlight-v3.png' import greenlight from './res/greenlight-v3.png'
class MyImage extends React.Component { // define the class properties for RED/LIGHT information (use object type) RED_LIGHT = {id:0, strName:'red light', strLoc: redlight}; GREEN_LIGHT = {id:1, strName:'green light', strLoc: greenlight};
state = { data : this.RED_LIGHT, // default state }
public changeLight = (_id:number) => { switch(_id){ case 0: this.setState({data : this.RED_LIGHT}); break; case 1: this.setState({data : this.GREEN_LIGHT}); break; default: alert('Invalid _id, changeLight, MyImage. _id = . Act: use Red Light as default' + _id); this.setState({data : this.RED_LIGHT}); } };
render() { return ( <div> <img src={this.state.data.strLoc} ></img> </div> ); } }
export default MyImage; |
2.2. APP
File: ./src/App.tsx
import React, { useState } from 'react'; import logo from './logo.svg'; import './App.css'; import Button from '@material-ui/core/Button'; import MyImage from './component/my-image';
let intLightId:number = 0; function App() { // Create the Ref to your component let myimage = React.createRef<MyImage>(); const onChangeLight = async () => { console.log('onChangeLight') intLightId = (intLightId + 1) % 2; (myimage.current as MyImage).changeLight(intLightId); }
return ( <div className="App"> <header className="App-header"> <p> <MyImage ref = {myimage} /> <Button onClick=onChangeLight} variant="contained" color="primary"> Success </Button> </p> </header> </div> ); }
export default App; |
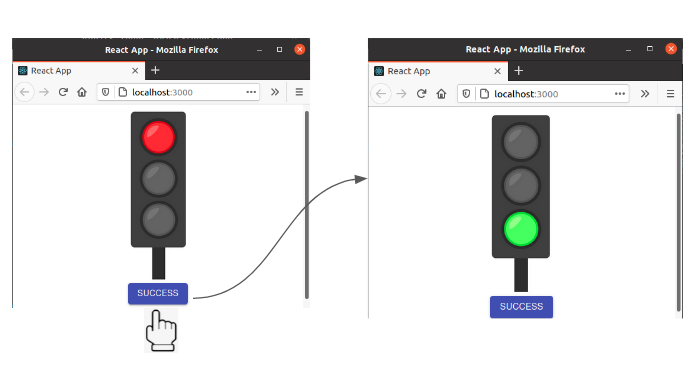
Fig. Click the button, switch the light. (edit)
3. Further Information
How to create a React component
How to add an image to the React component
